Pipe Systems > Accessories > Cement & Cleaners
|
|||||||||||||||||||||||||||
 |
Cleaners PVC-U, PVC-C, ABS[Show subcategories] |
 |
Cement PVC U[Show subcategories] |
 |
Cement PVC C[Show subcategories] |
||||||||||||||||||||||
 |
Cement ABS[Show subcategories] |
||||||||||||||||||||||||||
Safe connections for long-lasting stability - Adhesion of plastic piping systems |
|
The "chemical welding" or simply "adhesion" of plastic piping systems consists of a connection specifically designed for PVC-U pipes and fittings. The bonding is done using adhesives that are created from the solution of PVC-U polymer in a suitable solvent. These soften the walls of the pipes and fittings, after which the welding is done with the material contained within the walls. Chemical welding allows for permanent connections that guarantee properties of chemical and mechanical strength, similar to those of the pipes and fittings used. The choice of adhesive depends on the type of resin, as the solvents and additives contained therein may vary. It should be noted that an adhesive for connecting PVC-U pipes within the PVC-U system may be used for bonding pipes, fittings, and valves of the same series. Note:The adhesive used to connect parts belonging to the PVC-U system must not be used for connecting other parts that do not belong to the system. Instructions for adhesion:Before performing the bonding, it is important to check the good condition of the accessories, especially the flowability, expiration date, and homogeneity of the adhesive material. Cut the pipe vertically. To obtain a proper cut, it is advisable to use a suitable pipe cutter with rollers; such a tool is specifically designed for cutting plastic pipes. |
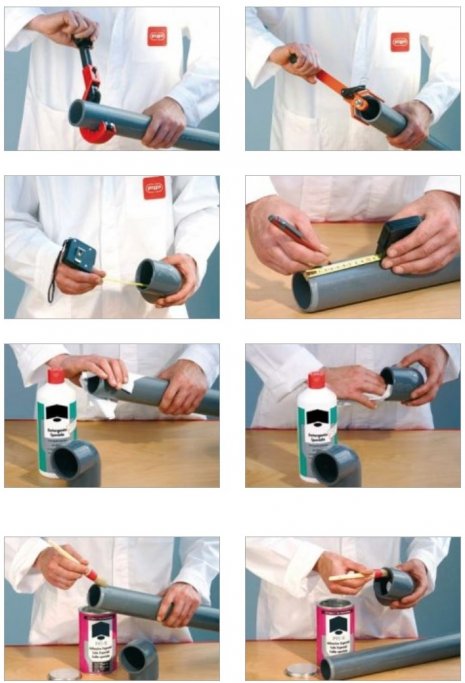 |
Bevel the outer surface of the pipe end at a 15° angle so that it can be properly inserted into the fitting. This operation is very important as not beveling it can result in scraping off the adhesive from the fitting surface and compromise the quality of the connection. This process should be done using special chamfering tools.
Measure the depth of the socket for adhesive application. Mark the measured value on the pipe end. Using a clean, absorbent paper towel or a brush moistened with cleaner, remove any traces of dirt and grease from the entire bonding length. Repeat the same process for the inner surface of the socket to soften its surface. Allow the surfaces to dry for a few minutes before applying the adhesive. The cleaner not only cleans the surfaces before bonding but also has a softening effect, preparing the parts for the adhesive to achieve an optimal connection. Apply the adhesive evenly and in the longitudinal direction to the parts to be connected (pipe outer surface and inner adhesive socket surface). Use a rough brush of appropriate size. It is advisable to use a brush that is at least half the size of the pipe diameter. The application of adhesive to the pipe and fitting must be done along the entire length of the bonding surfaces: - On the entire insertion depth up to the stop - On the entire bonding length of the pipe (previously marked on the outer surface) |
|
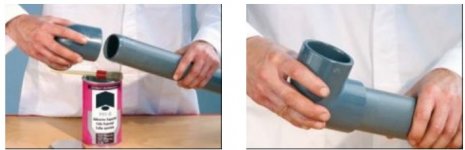 |
Insert the pipe into the fitting along the entire bonding length without rotation. Only after this step, both components can be slightly rotated (maximum rotation between pipe and fitting: 1/4 turn). This rotation will evenly distribute the applied adhesive. |
|
The connection between the pipe and fitting must be done quickly (avoid longer times than 20-25 seconds). Depending on the pipes outer diameter and the forces involved, the connection of the pipe and fitting should be performed as follows: - Outer diameter d < 90 mm by one person. - Outer diameter d 90 mm to < 160 mm by two people. - Outer diameter d > 160 mm using insertion devices. |
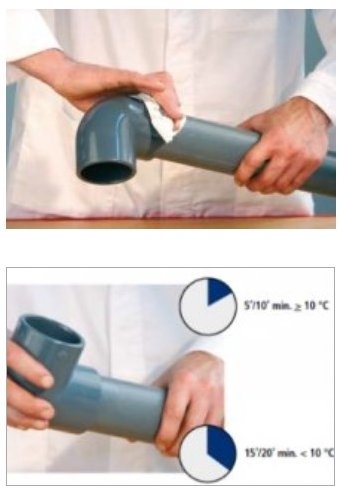 |
Immediately after inserting the pipe into the fitting (until it reaches the stop), fix the parts for a few seconds, and then remove the excess adhesive using masking tape or a cloth, if possible, from the inner surfaces as well. Drying of the adhesive: It is important to let the connected parts rest to allow for natural evaporation of the adhesive. The evaporation time depends on the stress the connection will endure later. The following minimum times should be observed at room temperature: Before applying any load to the connection: - 5 to 10 minutes for ambient temperatures > 10°C -15 to 20 minutes for ambient temperatures < 10°C - For repair welds not subject to hydraulic testing, valid for all dimensions and pressures: - 1 hour per bar - For connections subject to hydraulic testing for pipes and fittings up to PN 16, regardless of diameter, a minimum waiting time of: -24 hours must be observed. The specified evaporation times of the adhesive also depend on room temperature. For specific climatic conditions (humidity, temperature, etc.), we recommend contacting our technical service and/or the adhesive manufacturer for further assistance. |
IMPORTANT.If the outer diameter of the pipe and the inner diameter of the fitting are at the limit of the tolerance range, the dry pipe should not be inserted into the dry adhesive socket. Insertion is only possible after applying cleaner and adhesive to the two parts to be connected. - The adhesive is made from the same resin used by FIP for manufacturing pipes, fittings, and valves of the PVC-U system. Unless otherwise specified, the adhesive must cover the following tolerances: - Max. Oversize: 0.2 mm. - Max. Gap: 0.6 mm. - When using the adhesive and cleaner, it is advisable to follow the following instructions: - Wear safety gloves and goggles to protect your eyes and hands. - Use the adhesive and cleaner only in well-ventilated areas (these substances can irritate the respiratory system and eyes). - Due to the volatility of the solvents contained in the adhesive and cleaner, it is important to close the containers immediately after use. - The solvents in gaseous phase tend to form flammable gases. Therefore, all potential sources of ignition should be removed or avoided, such as welding operations, electrostatic discharge, and smoking. Follow the instructions provided by the adhesive manufacturer on the packaging. - It is recommended to perform the adhesion only at temperatures between +5 and +40°C to achieve optimal bonding. - The adhesive requirement for a bonding depends on various factors (climate, pipe dimensions, adhesive viscosity, experience of the personnel, etc.) that are not easy to assess. |
Optimize your shopping experience with our detailed delivery information |
Partnership at the highest level. |
|

|

|


|


|
|


|